Taking a brief detour from “My journey to Linux”, I wanted to overclock my Geforce GTX 760, as I had done the same on Windows.
Caution: Overclocking will void your warranty and could fry your graphics card. Continue at your own risk!
Now with that out of the way, let’s get down to business 🙂
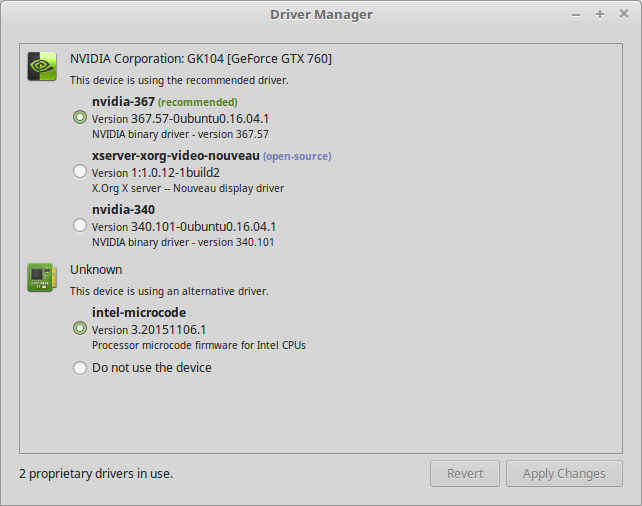
First step is to enable the proprietary driver, if you haven’t done so already – I went with the newest one available as seen below:
The second step is to enable the coolbits extension, to do so run this from a terminal:
sudo nvidia-xconfig --cool-bits=12
After this you have to reboot the PC.
After the reboot start the NVIDIA X Server Settings application, and go to “PowerMizer”, here you can enter offsets for both the core and memory for your graphics card.
To apply a value, just press ENTER in the “Current” box, it’ll say something like “Graphics Clock offset set to XX.” at the bottom of the screen, like mine does here:

Finally you need a tool to see whether you went too far with your overclock. I used Unigine Heaven which is very simple to install:
- Start by downloading Unigine Heaven from their site: https://unigine.com/products/benchmarks/heaven/ – it has a big download button on the frontpage at the time of writing.
- Once downloaded, do a
chmod +x Unigine_Heaven-4.0.runto be able to run it. - Now run the installer with
./Unigine_Heaven-4.0.run– this will extract the tool to a subfolder from where you run it - And finally run the tool with
cd Unigine_Heaven-4.0

./heaven
With heaven running, I moved NVIDIA X Server Settings to my secondary monitor, and simply started tweaking the settings – constantly looking at heaven for artifacts.
Always find the maximum safe clock for EITHER core or memory first – don’t increase both simultaneously or you wont know which one causes issues, once you hit a wall.
I went with 50mhz steps for memory first, increasing it by 50mhz, waiting for around 10 seconds, increasing it again and so forth. Eventually I noticed artifacts in the form of oddly colored rectangles popping into the image every once in a while. This was when I’d gone too far.
I backed down the clock by 50mhz until these disappeared, and noted this as my safe memory overclock.
Then I dropped memory overclock back to 0mhz, and did the same with core – although only increasing by 10mhz at a time here. Once you get too far with core overclock it’s likely your system will hang. You will have to flick the power switch or use a hard reset button to reboot it. Now you know what’s too much – I’d then subtract a few steps (like 20-30mhz) from that value, and run a couple of benchmarks in heaven to see if it’s stable.
For me my GTX 760 crashed at 90mhz core overclock, so I went the very safe route and stopped at 50mhz since the last few mhz didn’t really give much improvement. Memory started causing artifacts at 1500mhz overclock, so I went with 1400mhz as my safe value.
Then I ran a couple of benchmarks to ensure it was stable.
Do note: Despite running benchmark for 30 minutes, your system could still become unstable after hours of gaming – if you want to be absolute certain it’s stable you’ll have to let it run heaven for at least as long as you normally game in one sitting. I didn’t do this, and as such my overclock may prove to be too much in the future. Choose for yourself whether you want the risk of crashing mid-game down the road 🙂
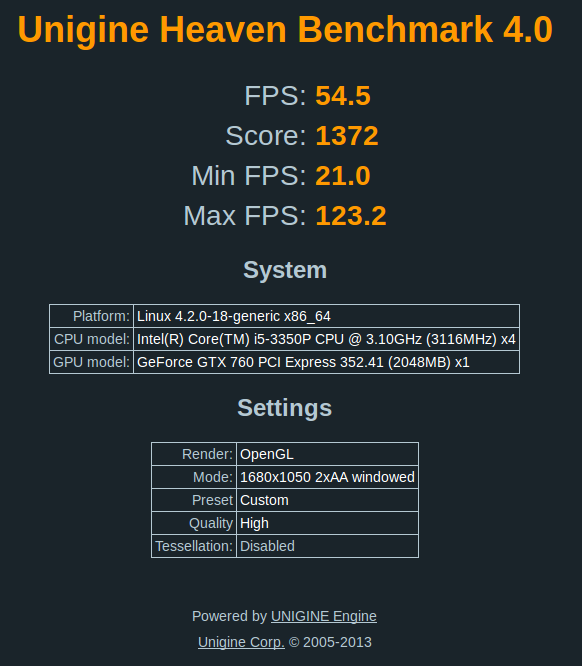
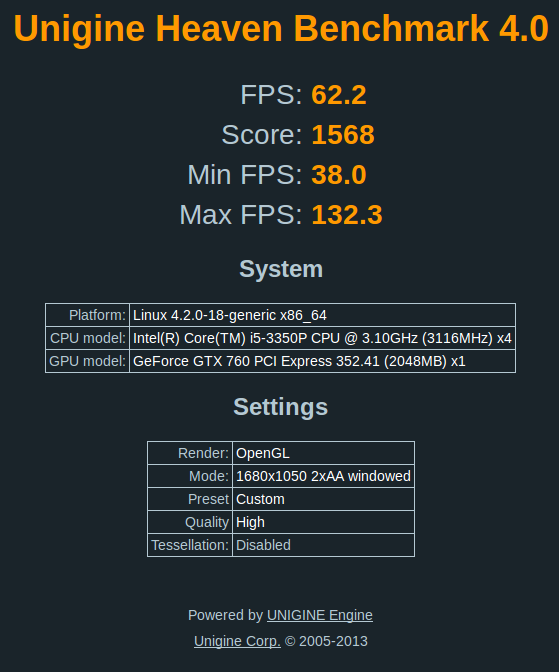
As a conclusion, here are the stock and overclocked results I got in Unigine Heaven. Notice how much the Min. FPS has increased – this is crucial for smooth gaming 🙂
Stock
Overclocked
Finally to automatically apply these settings at boot, we have to do a bit of manual work. The nvidia X server settings doesn’t support loading overclocks, so I went and created a simple bash script, and added it to startup applications.
The scripts is as simple as:
#!/bin/bash

nvidia-settings -a '[gpu:0]/GPUMemoryTransferRateOffset[3]=1400'

nvidia-settings -a '[gpu:0]/GPUGraphicsClockOffset[3]=50'
A brief explanation is in order:
[gpu:0] means to apply the setting to my primary graphics card, if I had two I would use both [gpu:0] and [gpu:1].
GPUMemoryTransferRateOffset is how much I want to overclock the memory.
GPUGraphicsClockOffset is how much I want to overclock the core.
[3] means to apply the overclock to “performance level 3” of my graphics card, this is the level a GTX 760 will utilize for running games. The lower levels are used when just browsing etc.
1400 and 50 are the mhz values for each overclock value.
I hope this post helps you guys get that last bit of power out of your hardware – in my case I got quite a healthy increase (especially for min. FPS, which is crucial for smooth gameplay) so it was well worth the effort 🙂